Propagate From
Cuttings
Clone your brugmansia with stem cuttings. The only way to get a cultivar of brugmansia to be true is through cloning, or stem cuttings. They do not propagate true from seed. Learn how to do it right here. Read on, fellow gardeners!
Propagation of plant material from cuttings can be very easy to do, with just a little effort and planning done by you. Most plants will render themselves useful for this method of propagation, but all will want a few conditions met in order to thrive.
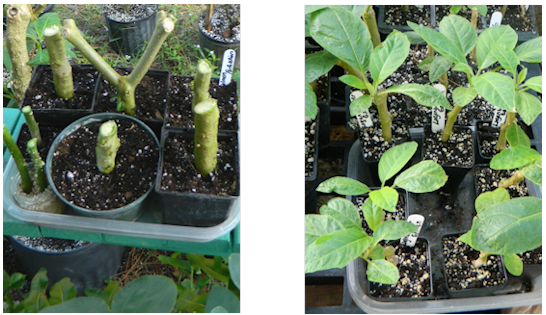
Since brugmansia is my love, and what I collect the most, it will be our model for this lesson. You will first need to meet a few conditions, as I mentioned above. The most important winning factor is temperature. I do this outside, in temperature ranges between no more than 84° daytime highs, and around 68° to 62° overnight temperatures. If it were any higher in the day, the cuttings would simply rot before they had any chance of putting out a root. The cool evenings take stress off the young, unrooted cutting.
If you are trying to root brugmansia up inside, in a cooler climate than I am, I cannot be a reliable source of information for you. I suppose using strong grow lights, an ambient temperature of around 78°, and using chemicals such as Physan (initially mixed in the soil's water) to ward off rot may be of some help to you indoor propagationists.
 But for the outside southern gardeners, let's give this a spin. First, be prepared in advance by feeding the mother plant well and giving her micronutrients at least two weeks ahead of your cutting schedule. This makes sure she is strong and gives your cuttings a better chance of taking. If you got your cuttings from me, I have done this.
When getting ready to cut, make sure you take your cuttings on an overcast, cool morning before the sun becomes too strong. Hopefully you have a table set up in a shaded area. Have your tools and supplies ready. This will include cutting shears, a fat pencil, permanent markers, scissors, planting cups such as Solo cups or small pots, seedling trays, (optional, but handy) unsulfured molasses, clean water, (rainwater if available) seedling style potting mix, plastic label style tags, and some damp paper towels to wipe your hands. If you have the nurseryman's sterilizing chemical Physan available to you, it is good to initially dampen the soil with (1 teaspoon per gallon) it to ward off rot and fungus.
 Ready the Solo cups by poking three of four holes in the bottom of each cup with scissors. Cuttings need good drainage in order to prevent the underground portion of the stem from rotting. Now fill the cups or pots with seedling type potting soil. Line them up either inside the seedling tray or set back off the table in front of you.
Retrieve your plant cutting material. Personally, I only cut on one brugmansia at a time. I have plenty reason behind this. If you were to go out and cut on 2 or 3 Angel trumpets at a time, even making a mental note of which is which, and then get back to your staging area and either drop, or forget, which is which you no longer know which brugmansia is say, 'Angels Endless Summer' or 'Angels Honeymoon.' You are now in pocession of some expensive, but worthless (to the collector) NOIDS. NOID stands for NO IDentification. No-one will collect these from you, as they are now no-name. So take my advice and collect only one Angel branch at a time, from one plant, before returning to the preparation area.
 Now you are ready to take your stem cuttings. After cutting them up, you will need to dip the rooting end in a weak unsulfured molasses or Superthrive. You can then dip the wettened end in powdered rooting hormone. Set the cuttings aside.
Take your fat pencil and using the eraser end, push it into each of the prepared pots, down about three quarters of the way into the soil. Place carefully one cutting into the hole, and firm the soil around it. If you have done as I mentioned, you will not need to make a tag for this cutting yet, as they will all be the same. If they are different, make a tag with your permanent marker now and push it into the pot along with the cutting now. Then deeply water the cutting. Repeat this process until all the cuttings are done.
When you are finished, place the tray of cuttings in a shaded, cool area of your garden or greenhouse. Do not overwater them, instead only water every few days. Make sure the top inch or so has dried out before applying more water. Even when you see leaves beginning to appear, don't become over zealous and hit them hard with the watering can. This can rot the underground portion of the stem. When it does finally begin to burst in full leaf, add more water than you have been. If at this point it continues to flourish, it has rooted, and a normal watering routine can commence.
This is the part of the process that you must really 'learn to tweak.' Pay close attention to your temperatures outdoors, as I mentioned above. And pay close attention to the overwatering. It is best to err on the side of underwatering. If after a few weeks you place your index and thumb around the base of one of your cuttings and it is spongy, it has most likely died. This does not mean it can't spring forth a new shoot (read last paragraph) but you will not get green leaves from the stem of this one.
Another trick that might help those of you who have high humidity or fungus problems in the past, or have had a green algae like slime on your seed pots from watering; is to root them up in pure vermiculite. This will not grow mold or algae, nor invite fungus gnats.
Note: Because they are cut off from the mother plant, and not receiving adequate nutrients, I add a weakened fertilizer, brugmansia tea, and Superthrive to the water every other time.
Continue to keep the young plant in shade for a few more weeks. I leave mine in this nursery stage for about 6 weeks, before slowly adapting them to stronger sunlight. Do not remove them from the nursery pots until you see strong root growth appearing out of the bottom of their pot.
Patience is a great Virtue...
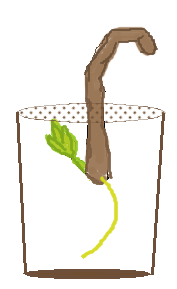 One more amazing thing I would like to add about how vigorous brugmansia can be. I have had cuttings lay over limp, which is truly a sign of death. Leaving it a few more days, I finally succumbed and pulled one up. To my surprise, the limp stem held underneath the soil, a tiny offshoot at the base and one long, thin root reaching for the bottom of the pot. If when you try to pull up a hollow feeling cutting, and it still wants to sit in soil, I suggest leave it. Don't be so hasty as to pull up that limp cutting. Brugmansia is truly a very determined plant in that it wants to survive, and will fight tooth and nail to do so. Give it a week or so and it might just send that shoot to the surface, and you'll have a plant after all!
If you have the mother plant and are taking your own cuttings, you might want to try Air-Layering instead. Liz Fichtl, a renowned Hybridizer of brugmansia, can show you how in her YouTube video: Air Layering Brugmansia. This is especially useful for hard to root brugmansia, such as Rothkirch or New Orleans Lady.
Tags: propagate your own plants from cuttings,, propagate your own plants from cuttings, brugmansia propagation, propagate your plants from cuttings, stem cuttings, propagation, cuttings,
This entry was posted on November 21st, 2013 and is filed under Propagate your own plants.

